
This article was originally featured as a talk at Firebase Summit 2021.
Authorization is the process of controlling who is, or is not, allowed to access something. This generally involves three key components:
- Resource: the entity for which you want to control access
- Permission: an action that can be performed on the resource
- Privilege: the assignment of a permission to a specific user (or group of users)
Implementing authorization models is the focus of this talk, but authorization should not be confused with authentication, which is the process of identifying who someone is, and then verifying that identity. Verification requires one or more factors, which include:
- Knowledge: something you know such as a password or PIN
- Possession: something you have like a cell phone or cryptographic token
- Characteristic: something you are which is typically a biometric such as fingerprint, facial features, or retinal pattern
Since we’re wanting to implement Authorization within Firebase, it’s important to understand what tools are provided to help us accomplish this goal.
- You can use a Cloud Function API to read and write data, which allows you a tremendous amount of programmatic flexibility and control. However, with this approach you lose out on much of the power and convenience of the Firebase SDK, especially the real-time access to read data.
- You can use Custom Claims on the authentication token to manage this information, but you’ll be limited to a strict 1000 byte limit. This works great for some things, such as assigning a User to a Role or Attribute, but doesn’t work well when you need to associate a User with a lengthy list of Resources. Also, you will need to use a Cloud Function to add the Custom Claim on the User’s Auth Token.
- You can use Rules to restrict access to data and files, allowing direct client access via the SDK. But then you are limited to a small number of simple, declarative statements.
The reality is that you’ll use 2 of these tools, or even all 3, in the implementation of your Authorization strategies. We’re going to talk about two common Authorization strategies, so let’s start with the first one.
Access Control List (ACL)
An Access Control List, or ACL, is a strategy commonly used for filesystems and networks. ACL is an option when there are a large number of resources, particularly when you need to share these resources with other people. Some resources that I’ve used ACL for include Customers, Projects, and Games.
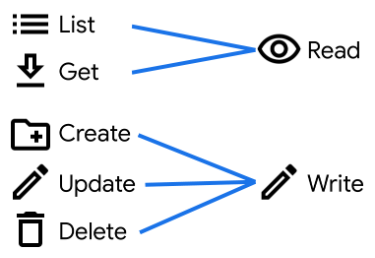
ACL works well with Firebase Rules because both are designed for quick, simple lookups and a small list of possible permissions. The permissions we will implement using Rules are:
- Admin for managing permissions
- List for querying lists of resources
- Create
- Read
- Update
- Delete
Firebase rules assume that DENY is the default and access is only granted with an explicit ALLOW rule. In fact, it’s not possible to write a DENY rule because once an ALLOW is found permission is granted immediately without further rules being checked. Stated another way, Firebase Rules are “Once true always true”. Because of this, we’ll follow this exact same paradigm in our Access Control List and exclusively write ALLOW lists.
Firestore
In order to show the Firestore implementation of ACL, we’ll need a demo application and data model. Here is the data model for the Resources we are trying to protect with authorization:
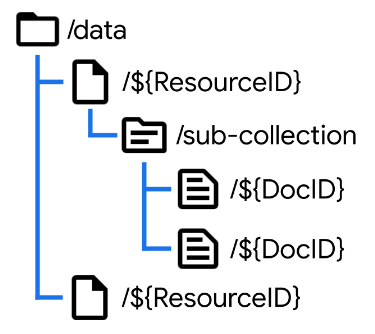
We have a top level data collection which contains documents representing our resources. In my apps this is where we would find Projects, Games, and similar resources that get shared between users. Under this resource document, we’ll have one or more sub-collections representing different types of data related to our top-level object, each of which may contain multiple documents.
Here is the data structure for the Access Control List:
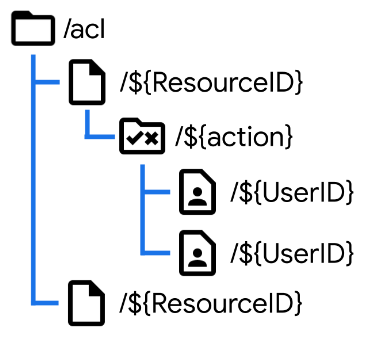
We’re using a resource-first approach which makes it easier to manage permissions resource-by-resource. Note that the ACL works at the Resource document level, and assigns privileges to a User to perform an Action.
Along with the data model, a fully implemented Firestore ACL demo can be found on GitHub:
https://github.com/M2D2co/auth-acl-firestore
The example application uses Google Authentication to manage login and credentials. When we login to the app, a new User record is added to the database in response to creating a new user account. This allows a client application to show a list of users and will allow us to build an Admin page without requiring us to query users via Cloud Function and the Admin SDK.
This is the cloud function that generates the database record for new user accounts:
import * as functions from 'firebase-functions';
import * as admin from 'firebase-admin';

export const onUserCreate_UserProfile_Create =
  functions.auth.user().onCreate(
    (user: admin.auth.UserRecord, context) => {
      const { uid, email, displayName, photoURL } = user;

      admin.firestore().doc('users/' + user.uid).create({ uid, email, displayName, photoURL });

    });
It triggers when a new account is created, pulls four fields from the User object, and then adds a record to the users collection using the Authentication UID as the document key.
To lock down this users collection we create a rule that allows a user to read and update their own record:
rules_version = '2';
service cloud.firestore {
  match /databases/{database}/documents {

    match /users/{userId}/{document=**} {
      allow list: if request.auth != null;
      allow read, update: if userId == request.auth.uid;
    }

  }
}
Since there is no create or delete rule, the Admin SDK will be required for these operations (such as the Cloud Function we just looked at). All authenticated users will be allowed to list users in the system. In a production-worthy implementation we would restrict this to a subset of users based upon our authorization model.
Going back to our example app, when a new Resource is created, the User who created it is automatically granted all necessary permissions to that resource. So any authenticated user can create resources, but only the person who created it has access to it from that point forward, unless they grant privileges to other people. This is a very common scenario in apps I’ve built and will work in a variety of situations.
To enforce this we need some rules:
    match /data/{resourceId} {
      allow list: if request.auth != null;
      allow create: if request.resource.data.createdBy == request.auth.uid;
    }

    match /acl/{resourceId}/{action}/{userId} {
      allow read: if userId == request.auth.uid;
    }
Just like the users collection, resources can be listed by all authorized users. Any authenticated user can create a resource, however they must correctly list themselves as the creator. The ACL rule allows users to view their own access permissions.
This is the Cloud Function used to generate the ACL records when a resource is created:
import * as functions from 'firebase-functions';
import * as admin from 'firebase-admin';

export const onDataCreate_ACL_Create =
  functions.firestore.document('data/{resourceId}').onCreate(async (snapshot, context) => {
    const { resourceId } = context.params;
    const { createdBy } = snapshot.data();
    const value = {
      createdBy,
      createdOn: admin.firestore.FieldValue.serverTimestamp(),
    };

    const waitlist: Promise<any>[] = [];
    ['admin', 'create', 'read', 'update', 'delete'].forEach(action => {
      waitlist.push(
        admin.firestore().doc(`/acl/${resourceId}/${action}/${createdBy}`).create(value)
      );
    });

    await Promise.all(waitlist);
  });
The UID of the user who created the record is taken as the createdBy property from the data itself, which we can do because the rules enforce that this is the authenticated user. Using the Admin SDK we create an ACL record on the Resource granting each Action to the creating user. And as with all cloud functions, we return a promise that completes once all of the operations finish.
Now when we login as a new user, as expected we can see a list of data, but cannot do anything with that data. The reason is that we have written rules to enforce the ACL:
    function testACL(rId, act) {
      let uid = request.auth.uid;
      let acl = /databases/$(database)/documents/acl/$(rId)/$(act)/$(uid);
      return exists(acl);
    }
This function is the magic sauce of this entire approach. It checks for the given Resource ID and Action that the authenticated user has an ACL record. We can then use this function to enforce each action in a way that is easy to read.
    match /data/{resourceId} {
      allow get: if testACL(resourceId, 'read');
      allow update: if testACL(resourceId, 'update');
      allow delete: if testACL(resourceId, 'delete');
    }

    match /data/{resourceId}/{document=**} {
      allow read: if testACL(resourceId, 'read');
      allow create: if testACL(resourceId, 'create');
      allow update: if testACL(resourceId, 'update');
      allow delete: if testACL(resourceId, 'delete');
    }
Only if the ACL record exists will the action be allowed. We can even use this function to protect subcollections and child documents of the original resource, by using the wildcard in our match expression.
Within the demo application, once we assign permissions to a second user they are now able to read the object (but not assign permissions), and then delete the object.
The rule that enforces administration (changing of permissions) is written against the ACL collection itself. Once again we use the testACL function to look for the privilege.
    match /acl/{resourceId}/{document=**} {
      allow read, write: if testACL(resourceId, 'admin');
    }
Limitations
There are a few limitations to using Firestore Rules to implement an ACL, but the first one you’re likely to encounter is the maximum of 10 access calls per rule set evaluation.
An Access Call is a get or exists call within a Firestore Rule and an evaluation is a single-document or query request. There is a limit of 20 Access Calls for multi-document reads, transactions, and batched writes. This may necessitate paginated queries of 20 (or fewer) documents at a time.
Additionally, queries are not filters, which means that if a query contains resources you’re not permitted to access, the entire query will fail. Because of this, in order to perform LIST operations (which you will often need), you may need to maintain a list of resources each user is allowed to access (typically within the user document or a sub collection) so that you can fetch only these documents and avoid “missing or insufficient permissions” errors, while still providing secure access.
Realtime Database (RTDB)
Now that we’ve shown how to implement Access Control Lists with Firestore, let’s take a look at how to do the same thing in the Realtime Database or RTDB. I use RTDB quite a bit in my own projects and use ACLs on those projects as well.
The first thing we need to look at are the available actions.
When we’re working in Firestore, the rules offer Read and Write actions, but also explicitly support the List, Get, Create, Update, and Delete actions we used in our example. However, the Realtime Database only offers us Read and Write actions, so we need to add support for these extra actions.
Before we can add the extra actions, we need to look at the way data is structured in the Realtime Database. While conceptually we can continue thinking of it as a set of collections and documents, the underlying implementation is a JSON data store. This means that when we list objects within the data node, we receive not just a list of resource IDs or even Resource objects, but also all of the sub-collections and sub-documents. This will have implications for our rules.
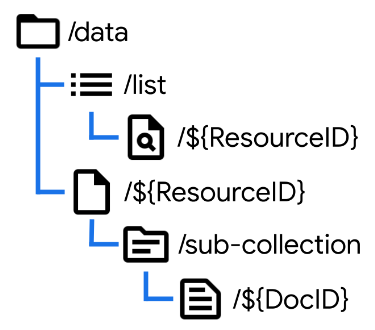
In order to add support for the List action, we’ll need to create an extra data node as shown here. Note that whatever we use for the name of the list (here simply “list”) will become invalid as a ResourceID later. By managing our own List node containing just the data we want included in lists, we can add support for our own custom action. It’s a bit of extra data management work, but provides extra flexibility.
The get action can simply be a read permission, but list is now implemented as an authenticated read on our list node.
    "data": {
      "list": {
        ".read": "auth.uid != null",
      },
      "$resourceId": {
        ".read": "root.child('acl').child($resourceId).child('read').child(auth.uid).exists()"
      }
    },
Create is a write rule that specifies the node doesn’t yet exist, but data is being written. This expression can be combined with others to create complex rule sets.
{
  "rules": {
    "users": {
      "$userId": {
        ".write": "!data.exists() && newData.exists()"
      }
    }
  }
}
Just an exclamation point away, Update is a write rule that specifies the node already exists, with new data being written.
{
  "rules": {
    "users": {
      "$userId": {
        ".write": "data.exists() && newData.exists()"
      }
    }
  }
}
And then Delete is a write rule that specifies the node already exists, with no new data being written.
{
  "rules": {
    "users": {
      "$userId": {
        ".write": "data.exists() && !newData.exists()"
      }
    }
  }
}
There's another example project available for the Realtime Database implementation of ACL, which is essentially the same as the Firestore example with the necessary adjustments.
https://github.com/M2D2co/auth-acl-rtdb
As before, when we create a new Resource the necessary ACL records are created on behalf of the current user.
"data": {
  "$resourceId": {
    ".write": "!data.exists() && newData.exists() &&
               newData.child('createdBy').val() == auth.uid"
    ".validate": "$resourceId == newData.child('id').val()"
  }
}
You’ll note that the first part of this write rule is selecting a Create action. We’re then combining this with a logical AND to make sure that the value of the createdBy property of the new record matches the currently authenticated user.
Finally there’s a validate rule that ensures that the ID property of the record always matches the actual ID of the resource.
Just like with Firestore, we use a Cloud Function to create the default ACL entries when a new resource is created.
import * as functions from 'firebase-functions';
import * as admin from 'firebase-admin';

export const onDataCreate_ACL_Create =
  functions.database.ref('data/{resourceId}').onCreate(async (snapshot, context) => {
    const { resourceId } = context.params;
    const { createdBy } = snapshot.val();
    const value = {
      uid: createdBy,
      createdBy,
      createdOn: admin.database.ServerValue.TIMESTAMP,
    };

    const waitlist: Promise<any>[] = [];
    ['admin', 'create', 'read', 'update', 'delete'].forEach(action => {
      waitlist.push(
        admin.database().ref(`/acl/${resourceId}/${action}/${createdBy}`).set(value)
      );
    });

    await Promise.all(waitlist);
  });
There are just two small changes:
- we include the UID as a data item. This is because the valueChanges() method for RTDB doesn’t return the ID of the resources (and snapshotChanges() can be cumbersome to work with in some contexts).
- we’re using generating an RTDB timestamp which is a Unix Epoch number.
As before, when a different user logs in, they are unable to access the data because they don’t yet have any assigned permissions. This is the full write rule that protects the resource. Because of the JSON syntax this can be a bit hard to read, but has been formatted here to make it just a bit easier.
"data": {
  "$resourceId": {
    ".write": "( !data.exists() && newData.exists() &&
        newData.child('createdBy').val() == auth.uid )
    || ( data.exists() && newData.exists() &&
        root.child('acl').child($resourceId).child('update')
          .child(auth.uid).exists() )
    || ( data.exists() && !newData.exists() &&
        root.child('acl').child($resourceId).child('delete')
          .child(auth.uid).exists() )"
  }
}
There are three sections separated by OR (double-pipe) operators. The first is create, the second update, and the third delete, which you can identify by the data/newData exists statements. The update statement uses the root object to lookup the ACL using the resourceId and currently authenticated user. It’s simply checking that the ACL record exists. The delete statement works the same way, with a different action name.
Note that in RTDB this one rule also covers Subcollections & Child Documents as well, since permissions automatically propagate to all children within the JSON structure.
Limitations
Because pulling an object in RTDB pulls all child nodes, the data structure is directly related to your security. This can cause security challenges down the road as projects grow and change. Also, the JSON syntax of RTDB is harder to write and maintain than the Firestore rules syntax.
Role-Based Access Control (RBAC)
Role-Based Access Control, or RBAC, is another extremely popular Authorization strategy that we can implement in Firebase. RBAC is an option when you want to manage permissions for a small number of roles, and then assign these roles to a large number of resources. When a User is assigned to a Resource, they are assigned a Role (instead of one or more Actions). Roles can be assigned to any number of complex permissions that make sense in the context of the application domain.
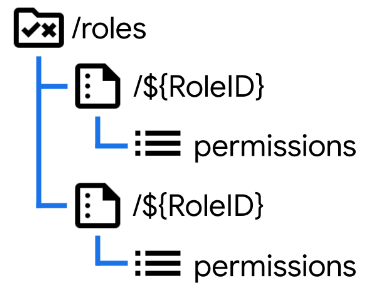
The way we assign permissions to resources with Role-Based Access Control is similar to Access Control Lists. The structure here looks essentially the same, except that we always use /users for our collection, and then each User assignment contains a specific Role.

Each role, then, has its own set of permissions. This could be a subcollection but I typically implement this using properties directly on the Role document.
Here’s an example of how you can use a Firestore Rule to check for a permission within a Role-based scenario.
function checkPermission(resourceId, perm) {
  let uid = request.auth.uid;
  let ac = /databases/$(database)/documents/rbac/$(resourceId)/users/$(uid);
  let roleId = get(ac).data.roleId;
  let role = /databases/$(database)/documents/roles/$(roleId);
  return get(role).data.get(perm, false)
}
We start by looking up the user assignment, then we look up the role, and finally we test for the desired permission. This function can be used throughout our rules in the same way as the testACL function we used earlier.
See a complete implementation of the Firestore Role-Based Access Control on GitHub:
https://github.com/M2D2co/auth-rbac-firestore
Benefits
There are a few advantages to this approach over ACL.
- The definition of a Role can be changed anytime by updating a single document
- Can easily provide permissions beyond the scope of CRUD + List + Admin (for example, you could create an admin permission that allows a user to grant read-only access to other users, but not any other form of access)
Limitations
This approach effectively doubles the minimum number of Access calls since you must lookup the Resource - User assignment and then lookup the permissions from the Role. Also, the more creative you get with the permissions the harder it may become to write the enforcement rules (and this may correspondingly increase the number of access calls required).
Summary
This has been a lot of information, so let’s take a moment to summarize.
- Pick an Authorization Strategy: Access Control List, Role-Based Authentication, or even something else.
- Select Firestore or Realtime Database (or even both!) and design a structure for your data
- Write the Rules needed to enforce the permissions you have set
- Support with Cloud Functions where necessary