
When putting together a simple web page, especially something small with static hosting such as GitHub Pages or Firebase Hosting, one of the biggest challenges can be handling the output of a form. To do this, it's typically necessary to setup some sort of server or perhaps incorporate an SDK library. Ideally, we could use tools that already exist in the browser to submit the form to a platform that requires very little setup.
Some common criteria for handling forms on a public website include:
- Store the data in a secure repository
- Process the response (by sending data to one or more other systems)
- Allow error handling
- Provide data integrity
- Prevent unwanted submissions
- Avoid any heavy code or libraries
I'm going to show you how to meet all of these objectives using Firebase Realtime Database (RTDB) and Zapier to quickly and easily handle form submissions in a customizable way.
Form
For our example we'll build a Newsletter Subscription form on a website. The HTML for the form is straightforward:
<h2>Our Newsletter</h2>
<form onsubmit="subscribe(this)">
  <label>Email
    <input type="text" name="email">
  </label>
  <button type="submit">Subscribe!</button>
</form>
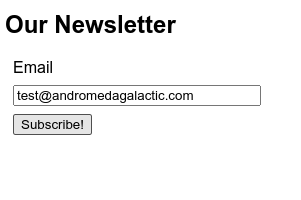
The final result (after a few lines of CSS) looks like this:
Database
For the database, create a new Firebase project, then go to the Realtime Database on the console (#1 in the image below) and add a database (we'll need to specifiy a region). Start with a locked down set of database rules - we'll expand these right away.
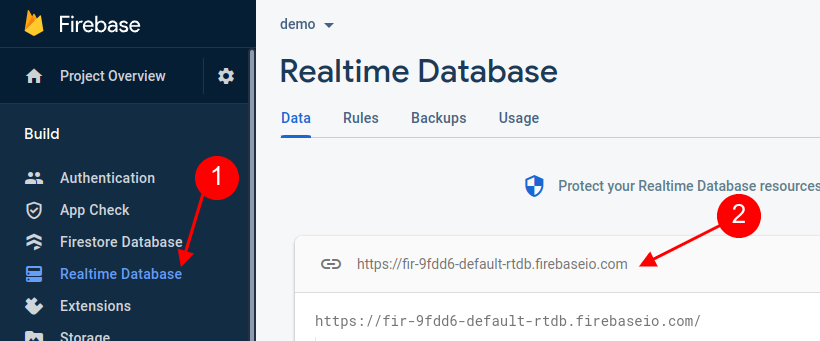
Once we have the database created, we have access to the Database URL (#2 in the image above). Make a note of this for the submissions step.
Now that we have the database, we need to secure it with some rules. Since we're building a newsletter subscription form we'll put our data in a "subscribe" collection. We don't want anyone to be able to read or write to this database, outside of some very specific criteria.
Here's an example of our rules:
{
  "rules": {
    ".read": false,
    ".write": false,
    "subscribe": {
      "$id": {
        ".write": "!data.exists()",
        ".validate": "newData.hasChildren(['email','timestamp']) && newData.child('timestamp').isNumber() && newData.child('email').isString() && newData.child('email').val().matches(/^.+@.+\\..+$/)"
      },
      ".indexOn": ["timestamp"]
    }
  }
}
We allow a write when data doesn't exist, which means that we're creating a new records (and not editing an existing record). We're then providing data validation by making sure that the email and timestamp fields exist, and are of the expected types. Note the simple regular expression verification on the email field.
We're also providing an index on the timestamp field so that we can query on this field later. In fact, the entire reason we need a timestamp field at all is to be able to identify when new records have been added. This will be essential for our Zapier integration.
Submit
There are two parts to handling the form - dealing with the in-browser events and form data, and then sending this data to our platform.
First, we create an event handler function an extract the data from the form:
function subscribe(form) {
  event.preventDefault();
  const fields = {};
  for (let i = 0; i < form.elements.length; i++) {
    const { name, value } = form.elements[i];
    if (value) {
      fields[name] = value;
    }
  }
}
Note that we already setup the form in the HTML file to call the subscribe function, so at this point the fields object will contain a set of field names and values for non-empty form fields.
Next we'll need the Database URL from the Firebase console to put together a fetch that will send the form to Firebase RTDB. Note that we are using POST, setting the content-type for JSON, and providing our form data in a JSON body:
  fetch("https://fir-9fdd6-default-rtdb.firebaseio.com/subscribe.json", {
    method: "POST",
    headers: { "Content-Type": "application/json" },
    body: JSON.stringify({
      ...fields,
      timestamp: Date.now()
    })
  }).then(response =>  {
    if(!response.ok) {
      throw new Error(response.statusText)
    }
    return response.json()
  }).then(json => {
    /* show success message */
    alert("Thanks for subscribing!")
  }).catch(error => {
    /* show error message */
    console.error(error)
  })
In this example we're simply using alert and console.error to handle success and error reporting, respectively. For your own form you can get as fancy as you want with the user feedback. We're using Date.now() for the timestamp, as this provides the current time in UTC as an epoch number with millisecond precision.
Prevent Abuse
At this point we've done nothing to prevent unwanted traffic, including bots, from being able to spam our form. We're going to use two simple techniques: a honeypot and a secure token (aka password).
Honeypot
The honeypot starts by adding a field to our form:
  <label id="hp" aria-hidden="true">Subject
    <input type="text" name="subject" tabindex="-1">
  </label>
Note that it has a tabindex of negative one in order to prevent keyboard access of the field, and aria-hidden to hide it from screen readers. Next we hide the field using CSS:
#hp {
  position: absolute;
  left: -99999px;
}
This way the field can't be filled out by a user, but shows up as a field to any bots that try to submit the form. It doesn't actually prevent anything until we add a rule to the database, where we update the .write rule:
".write": "!data.exists() && !newData.hasChild('subject')",
Now anytime the subject field is provided a value in a form submission, the database rejects the record.
Note: It's important to use a common field name here to trick the bots, but to avoid something that a password manager or user's browser autocorrect feature is likely to fill in. I've had good success with "subject" but would want to avoid fields like "firstName", "email", or "password". It's important that we don't block legitimate traffic. (This note is an update - I've changed this approach over time, initially using password which was bad, and later using non-common field names such as accept_terms_43953 or field types other than text.)
Token
The token works in the opposite way - it doesn't exist on the form, but is required. This field gets inserted into the submitted form data:
    body: JSON.stringify({
      ...fields,
      token: "zoH00vtEbTO35tWmA4u8eV1gYftJKm",
      timestamp: Date.now()
    })
Here I've used my password manager to create a random string that would be hard to guess. And once again, we need a database rule to enforce this security:
".write": "!data.exists() && !newData.hasChild('subject') && newData.child('token').val() == 'zoH00vtEbTO35tWmA4u8eV1gYftJKm'",
Zapier
At this point we have successfully captured submittions into the Firebase RTDB, but we haven't actually done anything with those submissions yet. This is where Zapier comes in.
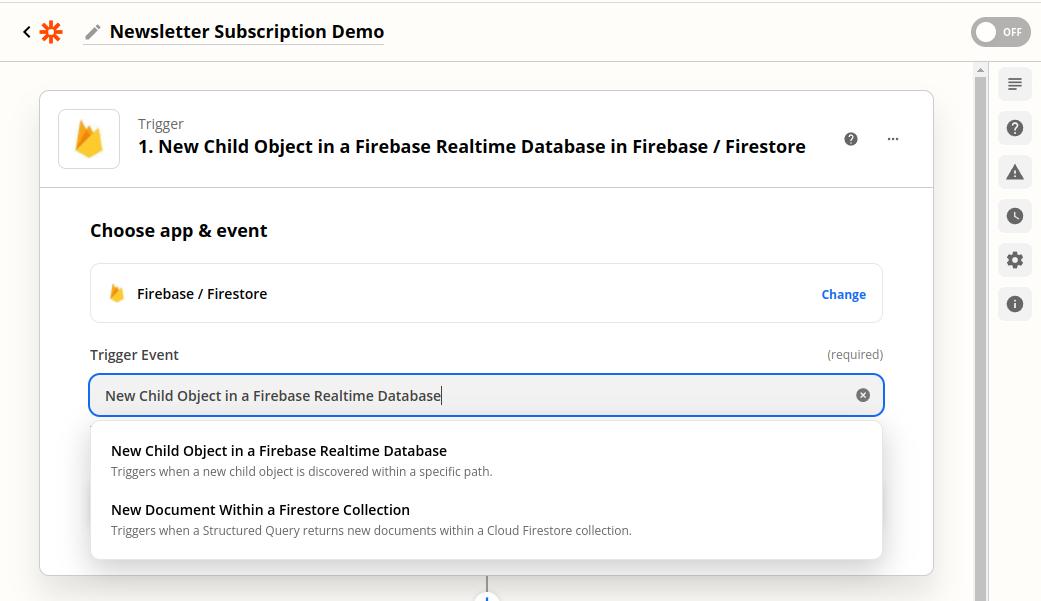
Let's login to our Zapier account and create a new Zap. Select Firebase / Firestore as the trigger and New Child Object in a Firebase Realtime Database as the Trigger Event.
The next step is to connect to the Firebase account. The Zapier instructions say to include your project ID (fir-9fdd6 in our example), but you may find that this doesn't work and you get a connection error. If this happens use the entire prefix from your Database URL that we used before (fir-9fdd6-default-rtdb in our example).
Once we're connected, we'll need to set up the trigger. The path in our case is simply "subscribe" and the order is "timestamp". If you expand on these instructions to create your own form handling system, the path can be anything that gets you to your form data, such as "forms/contact". For location of newest objects we'll select "bottom of results".
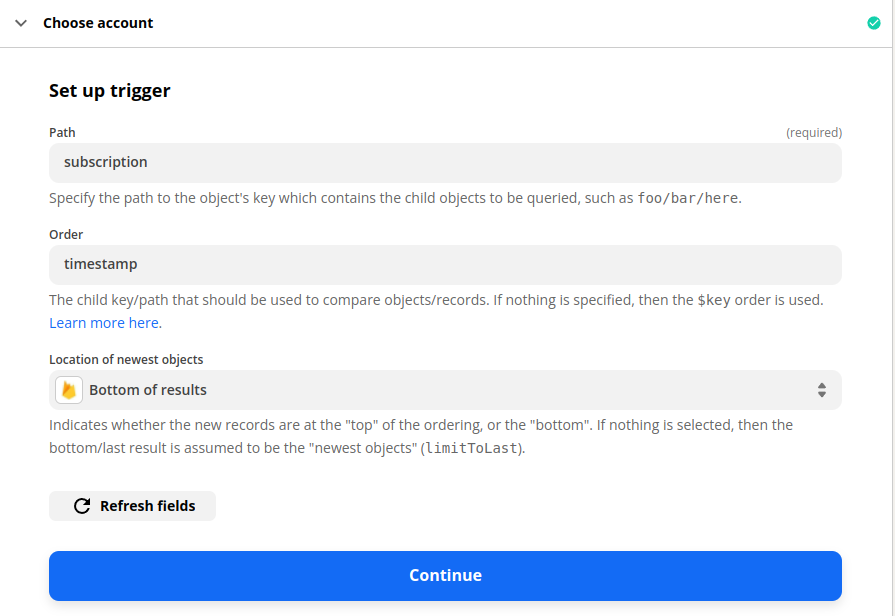
Continue to testing and make sure Zapier is able to find a record. (Note that we need to submit a record or two with the form prior to this step or you wont have any data to find!) If there are any errors, confirm that you have the Index in the RTDB rules and that your path is spelled correctly.
Next, we add a new action and select our email newsletter platfrom. I use AWeber for newsletters, but you can select Mail Chimp, HubSpot, or any other service.
Once you've selected your account and mailing list, select the email address from the firebase data to add to the list.
At this point we can turn on our Zap, or add additional steps, such as sending yourself a notification (via Slack, email, or something else) that someone has subscribed to our newsletter.
Summary
We've been able to build a complete newsletter signup solution on a static website without writing a single line of back-end code or spinning up a server. We've done this without adding any libraries to our website or writing any custom API integrations.
In short, the steps are:
- Create the form
- Setup the Firebase account including RTDB
- Write the JavaScript to submit the data using
fetch - Add the honeypot and secure token to avoid unwanted submissions
- Write the database rules and publish to Firebase
- Create the Zap within Zapier to perform the desired actions
If this helps you wire up a form on a website you're working on, please let me know! Tag me on Twitter at @mrdowden or send a message through our contact form.
The completed code is provided below:
RTDB Rules
{
  "rules": {
    ".read": false,
    ".write": false,
    "subscribe": {
      "$id": {
        ".write": "!data.exists() && !newData.hasChild('subject') && newData.child('token').val() == 'zoH00vtEbTO35tWmA4u8eV1gYftJKm'",
        ".validate": "newData.hasChildren(['email','timestamp','token']) && newData.child('timestamp').isNumber() && newData.child('email').isString() && newData.child('email').val().matches(/^.+@.+\\..+$/)"
      },
      ".indexOn": ["timestamp"]
    }
  }
}
Form HTML
<form id="contactForm">
  <label id="hp" aria-hidden="true">Subject
    <input type="text" name="subject" tabindex="-1">
  </label>
  < ! - - /* Form Fields Here */ - - >
</form>
Form Code
const form = document.getElementById('contactForm');
const submit = form.querySelector('button[type="submit"]');
submit.addEventListener('click', submitForm);


function submitForm(event) {
  fetch("https://fir-9fdd6-default-rtdb.firebaseio.com/subscribe.json", {
    method: "POST",
    headers: { "Content-Type": "application/json" },
    body: JSON.stringify({
      ...fields,
      timestamp: Date.now()
    })
  }).then(response =>  {
    if(!response.ok) {
      throw new Error(response.statusText)
    }
    return response.json()
  }).then(json => {
    /* show success message */
    alert("Thanks for subscribing!")
  }).catch(error => {
    /* show error message */
    console.error(error)
  })
}